总结摘要
Comentario 是一个轻量级评论平台,可以使用 Docker 轻松自行托管。这一切都是为了简单和隐私。Comentario 是用 Go 编写的,使其快速且易于使用。支持 Markdown 语法、Disqus 导入、评论投票、垃圾邮件和毒性过滤器、审核工具等。
前言
用了一段时间 Waline 后,感觉到 Waline 有点简陋,一个部署只能对应一个网站,不太灵活和自由啊。多方对比,选择了 Comentario 。
Comentario is an open-source web comment engine, which adds discussion functionality to plain, boring web pages.
Just put a <comentario-comments> where you want a comment thread to appear, and you’re all set!
Comentario 是一个轻量级评论平台,可以使用 Docker 轻松自行托管。这一切都是为了简单和隐私。Comentario 是用 Go 编写的,使其快速且易于使用。支持 Markdown 语法、Disqus 导入、评论投票、垃圾邮件和毒性过滤器、审核工具等。
Comentario 官网:
https://comentario.app/
Comentario 源码:
https://gitlab.com/comentario/comentario
docker 部署
新建 secrets.yaml 文件
 1
 2
 3
 4
 5
 6
 7
 8
 9
10
11
12
13
14
15
16
17
18
19
20
21
postgres :
host : db
port : 5432
database : comentario
username : postGres
password : postGres
#smtpServer:
# host: your.smtp.server
# post: 587 (or 465)
# username: YourEmailUserName
# password: YourEmailSmtpPassword
#idp:
# github:
# key: YourGithubIdpKey
# secret: YourGithubIdpSecret
# google:
# key: YourGoogleIdpKey
# secret: YourGoogleIdpSecret
设置的参数要与下面的 docker-compose.yml 文件对应。 此文件除了设置数据库相关外,还可以设置邮件提醒、第三方登录等,详细见官方
Secrets
说明。
新建 docker-compose.yml 文件
 1
 2
 3
 4
 5
 6
 7
 8
 9
10
11
12
13
14
15
16
17
18
19
20
21
22
23
24
25
26
27
28
29
30
31
32
33
34
35
36
37
38
services :
db :
image : postgres:17-alpine
container_name : comentario_db
restart : always
environment :
POSTGRES_DB : comentario
POSTGRES_USER : postGres
POSTGRES_PASSWORD : postGres
ports :
- "15432:5432"
volumes :
- ./postgresqlData:/var/lib/postgresql/data
healthcheck :
test : [ "CMD" , "pg_isready" , "-U" , "postgres" ]
timeout : 5s
retries : 5
start_period : 10s
app :
image : registry.gitlab.com/comentario/comentario
container_name : comentario_web
restart : always
environment :
BASE_URL : https://cct.yiwan.org
SECRETS_FILE : "/secrets.yaml"
ports :
- "127.0.0.1:9331:80"
healthcheck :
test : [ "CMD" , "wget" , "-O" , "-" , "http://localhost/api/user" ]
timeout : 5s
retries : 5
start_period : 5s
depends_on :
db :
condition : service_healthy
volumes :
- ./secrets.yaml:/secrets.yaml:ro
部署使用
执行 docker compose up -d 命令,如无错误,即可用浏览器打开
http://127.0.0.1:9331
即可进入 Comentario 管理。
为了能外网访问,需要设置反代。
设置 nginx 反代
nginx 网站配置文件 .conf 内容如下:
 1
 2
 3
 4
 5
 6
 7
 8
 9
10
11
12
13
14
15
16
17
18
19
20
21
22
23
24
25
26
27
28
29
30
31
32
33
34
35
36
37
38
server {
listen 80;
server_name cct.yiwan.org;
rewrite ^(.*)$ https://${server_name}$1 permanent;
server {
listen 443 ssl;
server_name cct.yiwan.org;
charset utf-8;
access_log /var/log/nginx/host.access.log main;
#ssl on;
ssl_certificate .ssl/apa-letsencrypt/*.yiwan.org/fullchain.pem;
ssl_certificate_key .ssl/apa-letsencrypt/*.yiwan.org/key.pem;
ssl_protocols TLSv1 TLSv1.1 TLSv1.2 TLSv1.3;
ssl_ciphers EECDH+CHACHA20:EECDH+CHACHA20-draft:EECDH+AES128:RSA+AES128:EECDH+AES256:RSA+AES256:EECDH+3DES:RSA+3DES:!MD5;
ssl_prefer_server_ciphers on;
ssl_session_cache shared:SSL:10m;
ssl_session_timeout 10m;
add_header Strict-Transport-Security "max-age=31536000";
# proxy to 8360
location / {
proxy_pass http://127.0.0.1:9331;
proxy_set_header Host $host;
proxy_set_header X-Real-IP $remote_addr;
proxy_set_header X-Forwarded-For $proxy_add_x_forwarded_for;
proxy_set_header X-Forwarded-Proto $scheme;
proxy_set_header REMOTE-HOST $remote_addr;
add_header X-Cache $upstream_cache_status;
# cache
add_header Cache-Control no-cache;
expires 12h;
}
如上,即可通过
https://cct.yiwan.org
访问。首次访问用任意邮箱注册,自动获得root权限,将成为超级用户。
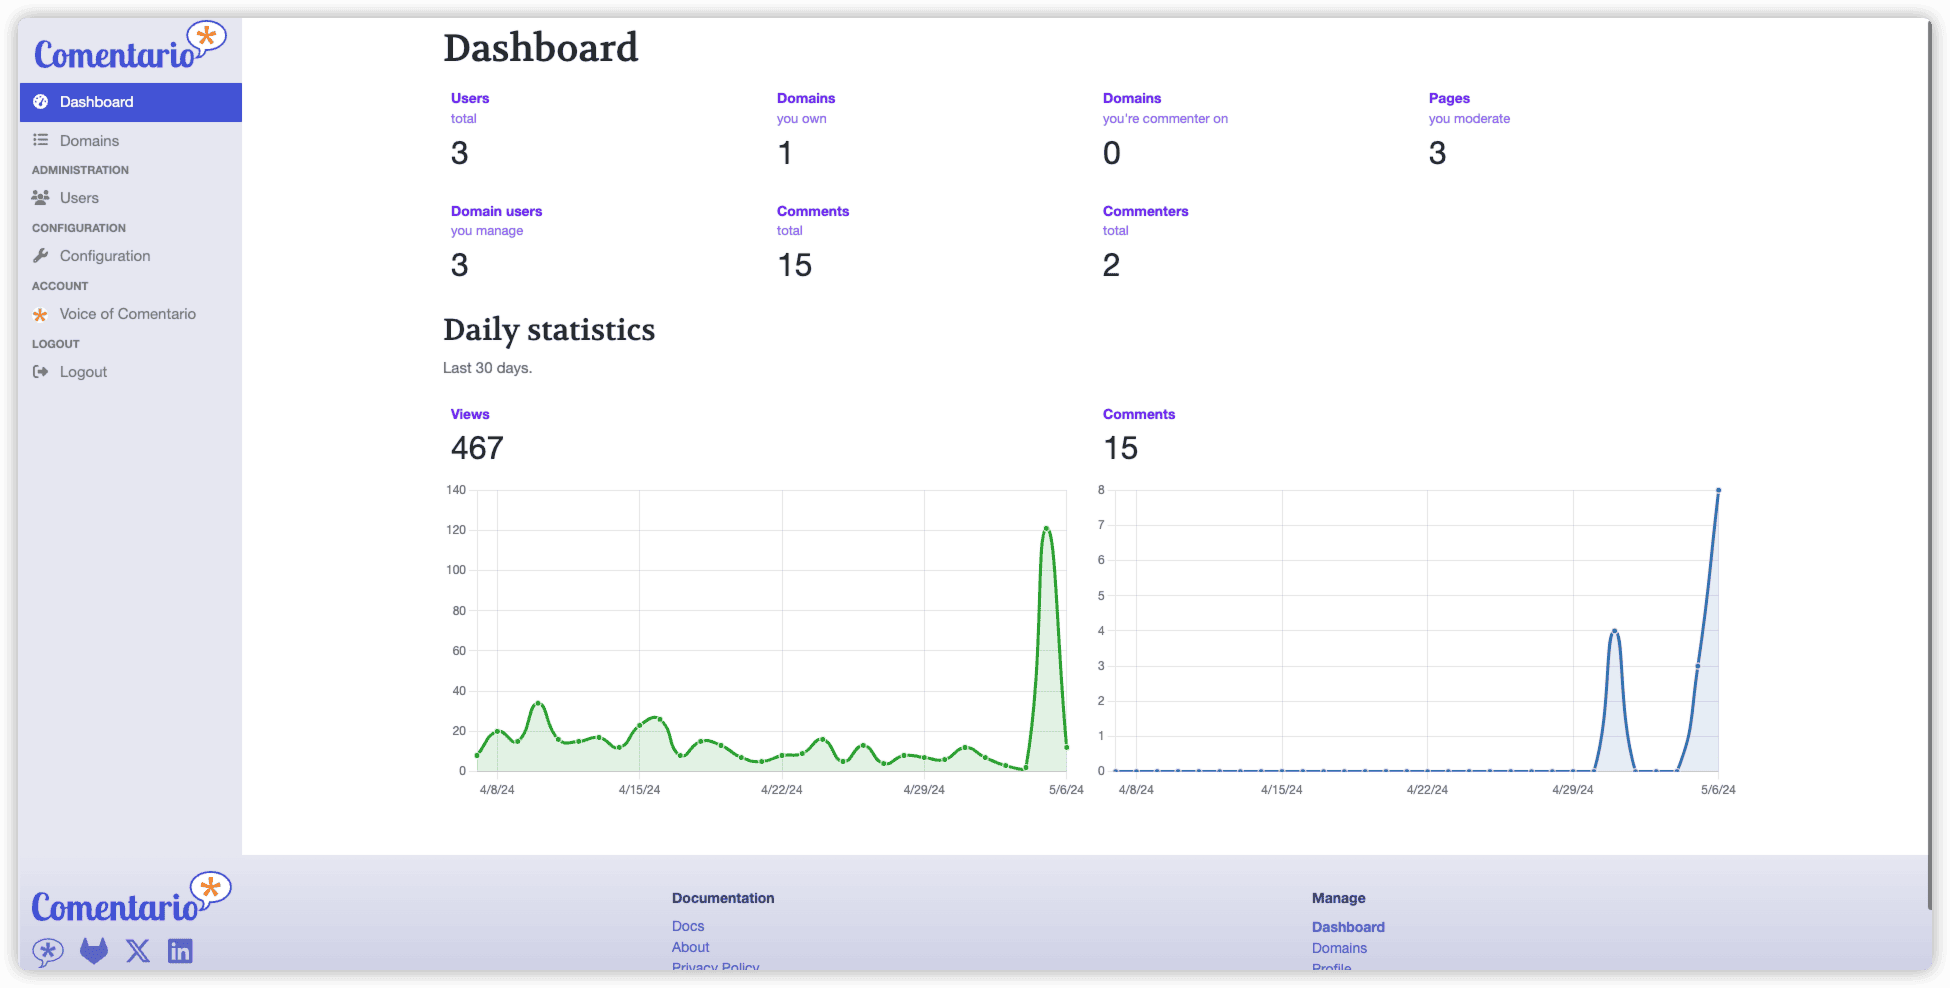
后台管理
访问
https://cct.yiwan.org
登录后台,即可管理。Comentario 后台比 Waline 功能多,且一目了然。
后台添加博客网站的域名(可以添加多个),如 wer.yiwan.org ,在博客网站适当页面添加如下代码:
1
2
< script defer src = "https://cct.yiwan.org/comentario.js" ></ script >
< comentario-comments ></ comentario-comments >
如此即可在页面显示评论的窗口。不需要添加其它代码,简单得很。
多域名情况下,可以参考以下设置:
信息
也可以不用设置下面的域名,评论系统会自己检测当前页面的域名,如果后台没有设置相应的域名,会显示没有相应的域名。
1
2
3
4
5
6
7
< script >
window . comentario = {
domain : 'laosu.me' // 改成你的域名
};
</ script >
< script src = "http://你的服务器IP:9331/js/commento.js" ></ script >
< div id = "comentario" ></ div >
后台可以直接导入 disqus 评论数据压缩包,不需要做任何工作。
添加样式以及光/暗模式切换,可以参考添加类似内容(我自己测试,未成功):
 1
 2
 3
 4
 5
 6
 7
 8
 9
10
11
12
13
14
15
16
17
18
19
20
21
22
23
24
25
26
27
28
29
30
31
32
33
34
35
36
< script defer src = "https://comments.example.com/comentario.js" ></ script >
< script >
window . addEventListener ( "load" , () => {
const comentarioComments = document . getElementsByTagName ( "comentario-comments" );
const defaultTheme = "{{ .Site.Params.your_default_color_theme }}" ;
const isToggleEnabled = {{ . Site . Params . your_color_scheme . toggle | jsonify }};
const userTheme = localStorage . getItem ( "theme" ); // current site color theme
function setComentarioTheme ( mode ) {
if ( mode === "dark" ) {
for ( const commentElement of comentarioComments ) {
commentElement . setAttribute ( "theme" , "dark" );
}
} else if ( mode === "light" ) {
for ( const commentElement of comentarioComments ) {
commentElement . setAttribute ( "theme" , "light" );
}
}
}
if ( isToggleEnabled ) {
if ( userTheme ) {
setComentarioTheme ( userTheme );
} else {
setComentarioTheme ( defaultTheme );
}
} else {
setComentarioTheme ( defaultTheme );
}
});
</ script >
< div class = "post__comments" >
< comentario-comments lang = "en" ></ comentario-comments >
</ div >
其他设置,自己都可以在后台完成。
Hugo NexT 主题嵌入评论
如上,Comentario 部署成功后,博客网站添加评论很简单,只需添加再三行代码即可。
以下以我NexT 主题博客(Hugo NexT 主题使用记录 )为例,说明嵌入过程。
从 Comentario 后台可以看到,是可以显示添加评论的页面的浏览数和评论数的,但是目前官方只有
Count tag
,而没有 Views tag (具体见
https://docs.comentario.app/en/configuration/embedding/
)。所以要显示,目前也只能显示评论数,不能像 Waline3 可以在文章头同时显示浏览数和评论数。
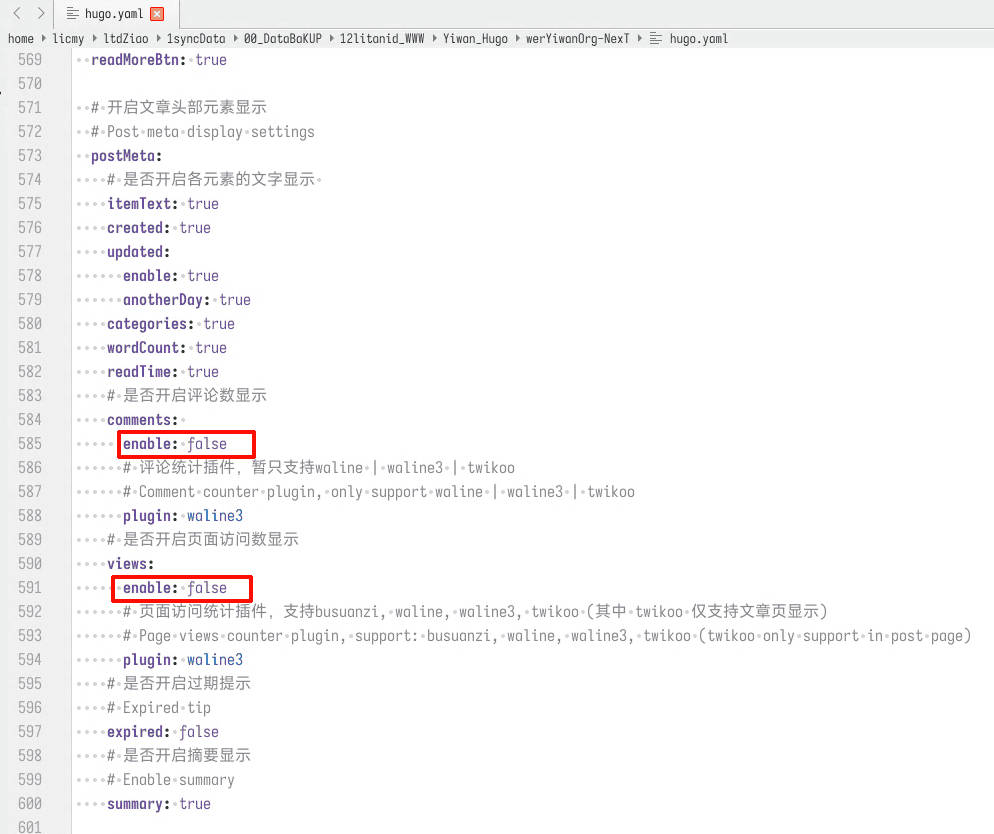
既然目前做不到,就先取消掉,让文章头不显示浏览数和评论数。如下,修改站点根目录下hugo.yaml文件里postmeta: 部分:
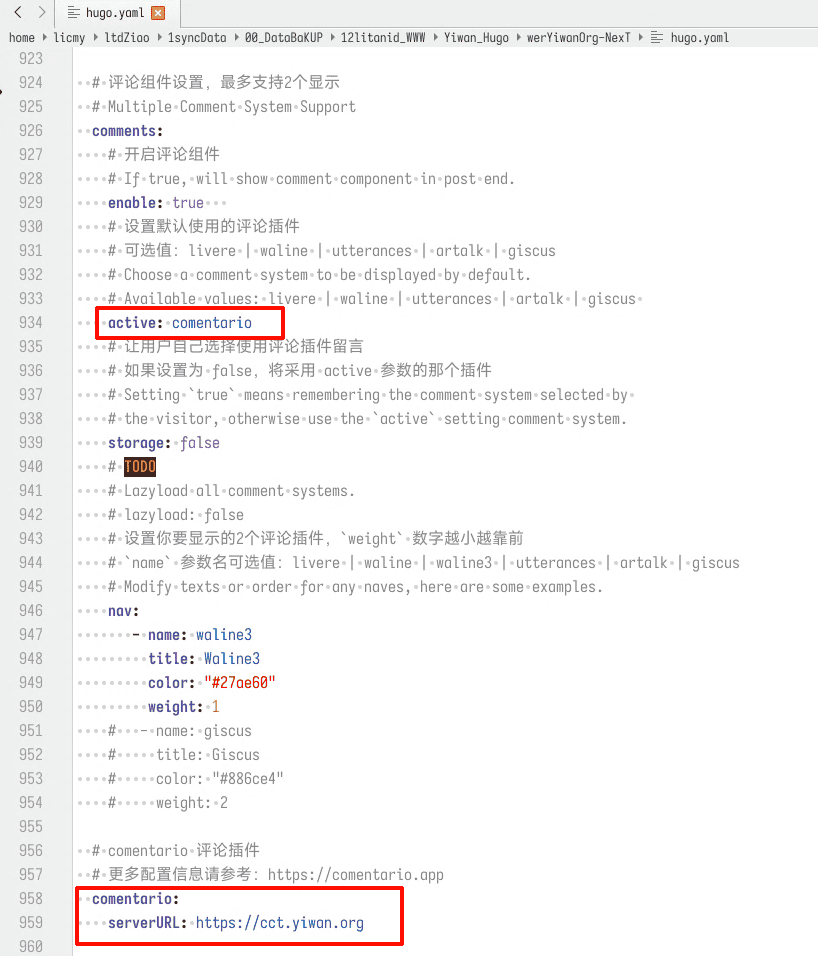
修改站点根目录下hugo.yaml文件里comments: 部分,修改添加图中红圈部分:
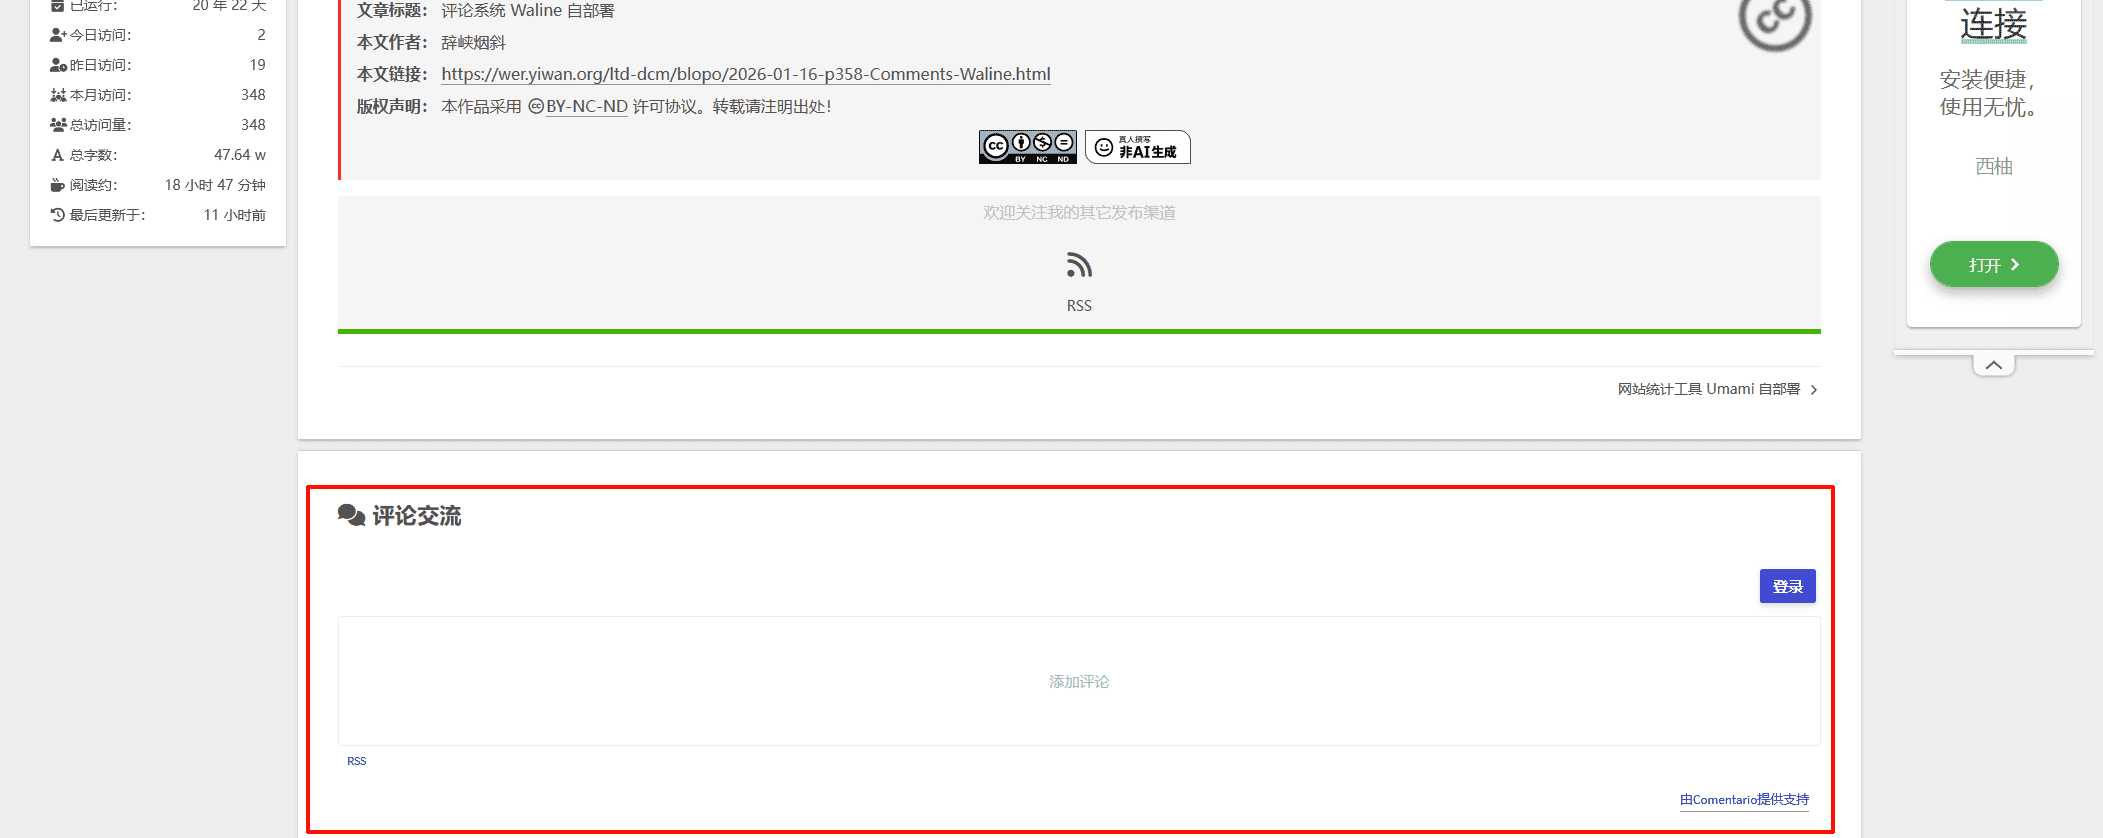
新增 /layouts/_partials/_thirdparty/comment/comentario.html 文件:
1
2
3
< script defer src = "{{ .Site.Params.comentario.serverURL }}/comentario.js" ></ script >
< comentario-comments ></ comentario-comments >
搞定。效果如下:
参考致谢
在使用过程中,参考并借鉴了以下网站内容(可能没列全),表示感谢。